FoldNotes for Writers
You’re writing a novel, a thesis, a screenplay, or a long essay. You’ve tried the apps that treat writing as a database of blocks. You’ve tried the apps that treat it as a text file with one font. Neither fits how you actually work.
FoldNotes sits between them. Your manuscript stays as plain Markdown files in iCloud Drive — readable in any text editor, openable from any device, never trapped in a proprietary format. But underneath that boring surface, the editor knows what a chapter is, what a scene is, what a sentence is. It can collapse the parts you don’t want to see, focus the part you do, and quietly track every task you’ve left for yourself in the margins.
Fold a chapter while you write
Headings define the structure. Click the fold arrow next to any heading and everything under it disappears into a single line. A 300-page manuscript becomes a one-screen outline. Click again and it’s back.
You can fold by indent too — under any task, list item, or block quote — so research notes and outlining structures collapse just as cleanly as prose.
Fold All (Cmd+Shift+K) gives you the manuscript’s spine in one keystroke. Fold to Level 2 (Cmd+Option+2) collapses chapters but keeps scene headings visible. Unfold All (Cmd+Shift+L) expands everything.
Hoist a chapter
When folding isn’t enough, Hoist removes everything except the chapter you’re working on. The Inspector outline narrows to that chapter’s scenes. The word count counts only the chapter. Preview and export operate on the chapter alone. It’s like opening a chapter as its own file — except nothing actually splits, and there are no separate files to keep in sync.
Tap the ↘ arrow next to a chapter heading to hoist. Tap the ↖ arrow to come back. On iPad and iPhone, drag through the gesture; on Mac, use Ctrl+Cmd+H.
Arrange chapters in narrative order
Tag each chapter or scene with a project tag (e.g. #novel/manuscript) and switch the note list to Manual sort. Drag the chapters into story order. That order is remembered per tag — #novel/manuscript keeps your manuscript in narrative sequence; a separate #novel/research tag can keep your source material in a completely different arrangement.
It’s the difference between “what did I last edit” and “where does this scene belong?”. Date sorts answer the first question. Manual sort answers the second.
Manual sort applies to one tag at a time. A specific tag like #novel/manuscript keeps its own order; a parent tag like #novel — which combines manuscript, research, and any other sub-tags into one view — doesn’t manually sort, because several tags are mixed together. The same goes for All Notes and rule-driven views (saved searches, Favourites, Untagged): those are derived lists, where a hand-curated order would be silently invalidated every time a note enters or leaves the set.
Read the Manual Sort documentation →
Focus on what you’re writing
Three focus modes that combine:
- Typewriter scrolling (Ctrl+Cmd+T) — your cursor stays at a fixed spot on screen, like a real typewriter
- Paragraph focus (Ctrl+Cmd+P) — every paragraph except the one you’re writing dims to the background
- Sentence focus (Ctrl+Cmd+S) — the spotlight narrows further to just the current sentence
Stacked together, you get a writing surface where only the words being shaped are bright. Everything else recedes.
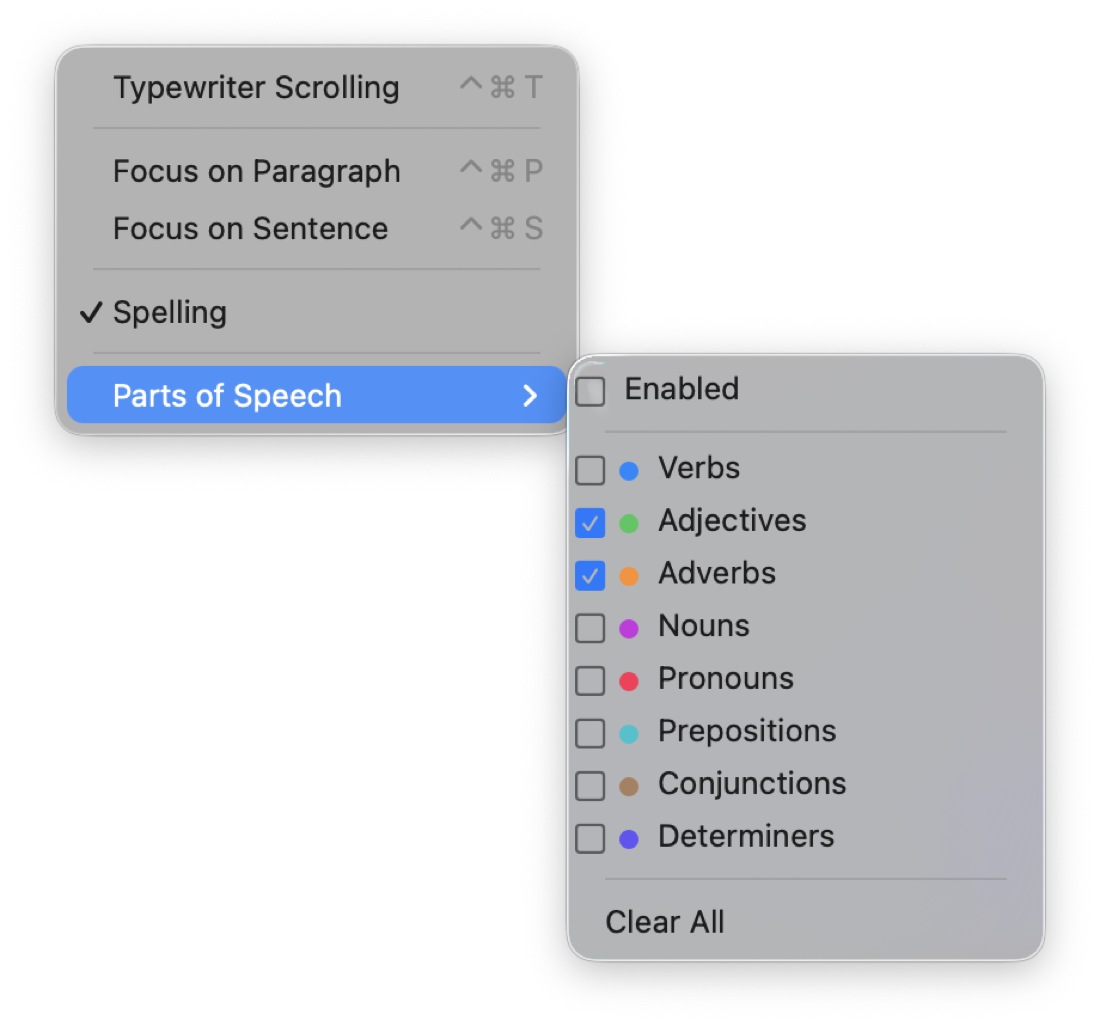
Parts-of-speech highlighting
Spot adverb infestation, passive voice, and repetition before the second draft. Tap a button and FoldNotes colour-codes every noun, verb, adjective, and adverb in the visible text. It’s hard to unsee how many “very"s and “really"s you wrote.
Styling that can’t miss
Drag a selection however you like — start in the middle of a word, finish in the wrong spot, sweep across a whole untidy line — then press bold or italic. FoldNotes works out what you meant: it snaps to whole words and styles only the text that should be styled. Inline code, links, tags, task metadata, even a table, are skipped automatically — and a selection that runs across one is split so the real words get styled and everything else is left exactly as it was. You can’t break a word in half, you can’t wreck a table, and you can’t end up with markup that refuses to preview. It’s the fiddly aiming, done for you — so your attention stays on the sentence instead of the cursor.
Footnotes
Standard Markdown footnotes work everywhere — body text, headings, even inside tasks. Reference them with [^1] and define them anywhere in the document. FoldNotes renders the marker as a clickable target in the editor and lays the notes out properly in every export (PDF, DOCX, EPUB, HTML). Useful for citations, asides, and translator notes without breaking the flow.
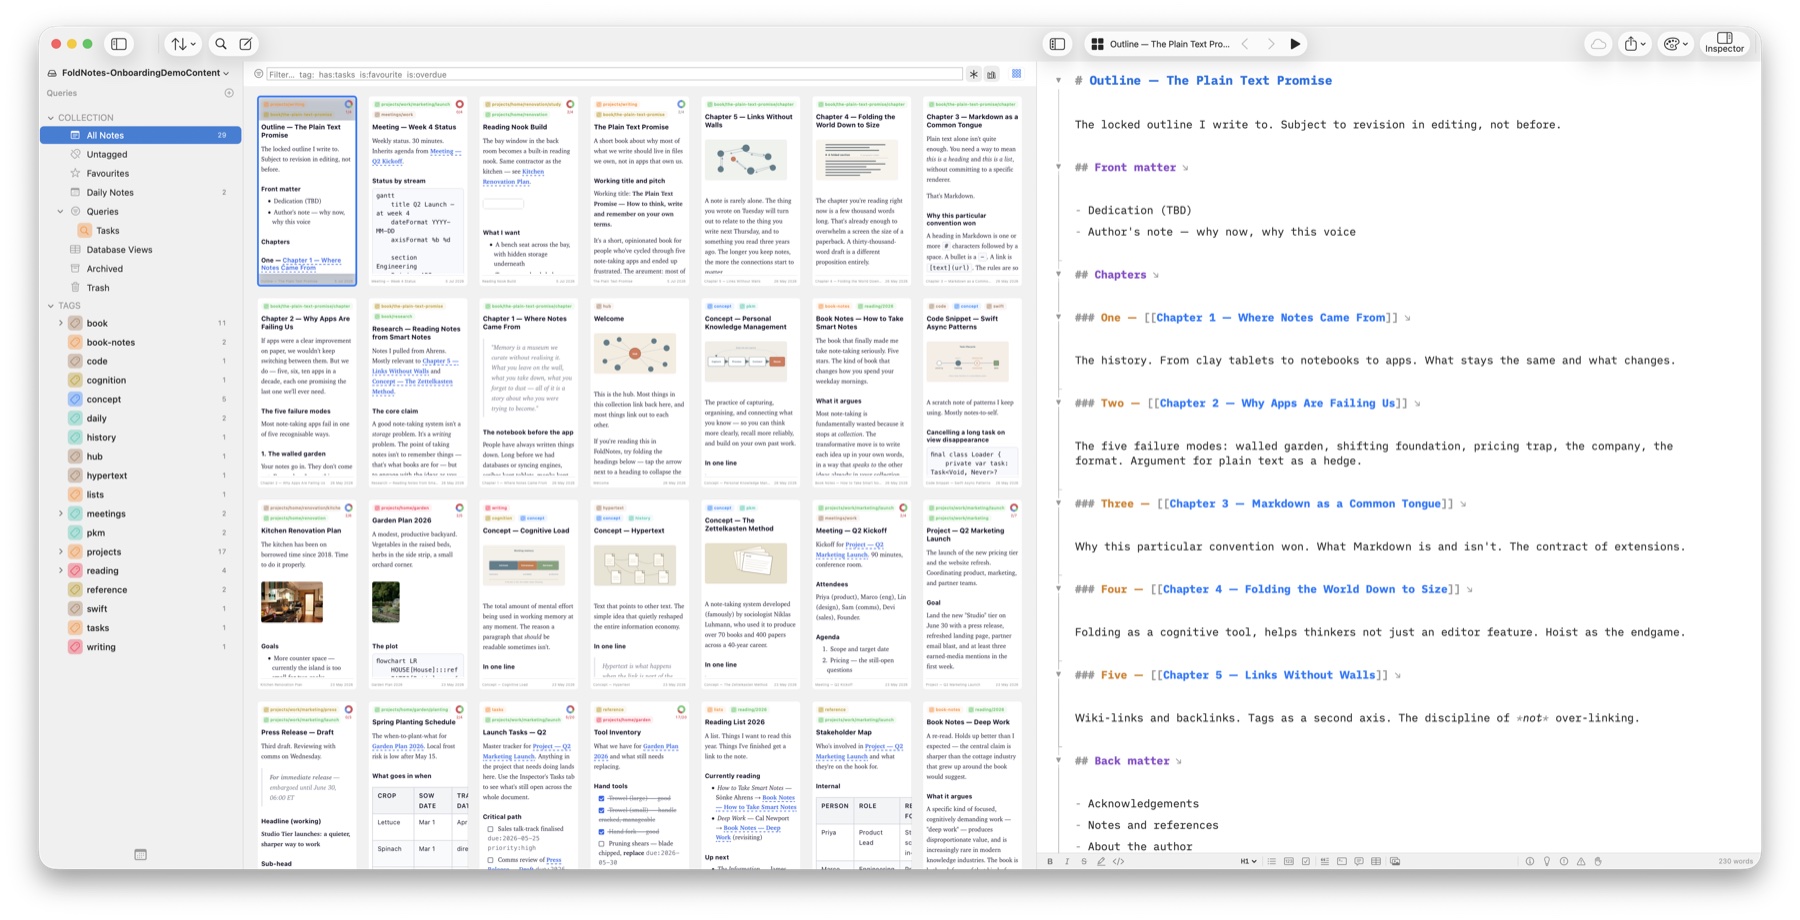
Gallery view as a chapter summary macOS
Switch the note list to Gallery view and every chapter or scene shows up as a card with the first hundred words or so visible. Run your eye down the column and you can see the shape of the manuscript at a glance — which scenes have body, which ones are still placeholders, which ones drift off-tone. It’s the closest thing to laying index cards out on a desk, except the cards are the actual chapters.
Combine with Manual Sort and you’ve got a draggable scene board with live word counts and tag pills.
And the cards scale. On a big display, drop the card size to 50% and the gallery becomes an index-card wall: dozens of chapters and scenes visible at once, with the manuscript’s outline still open beside them.
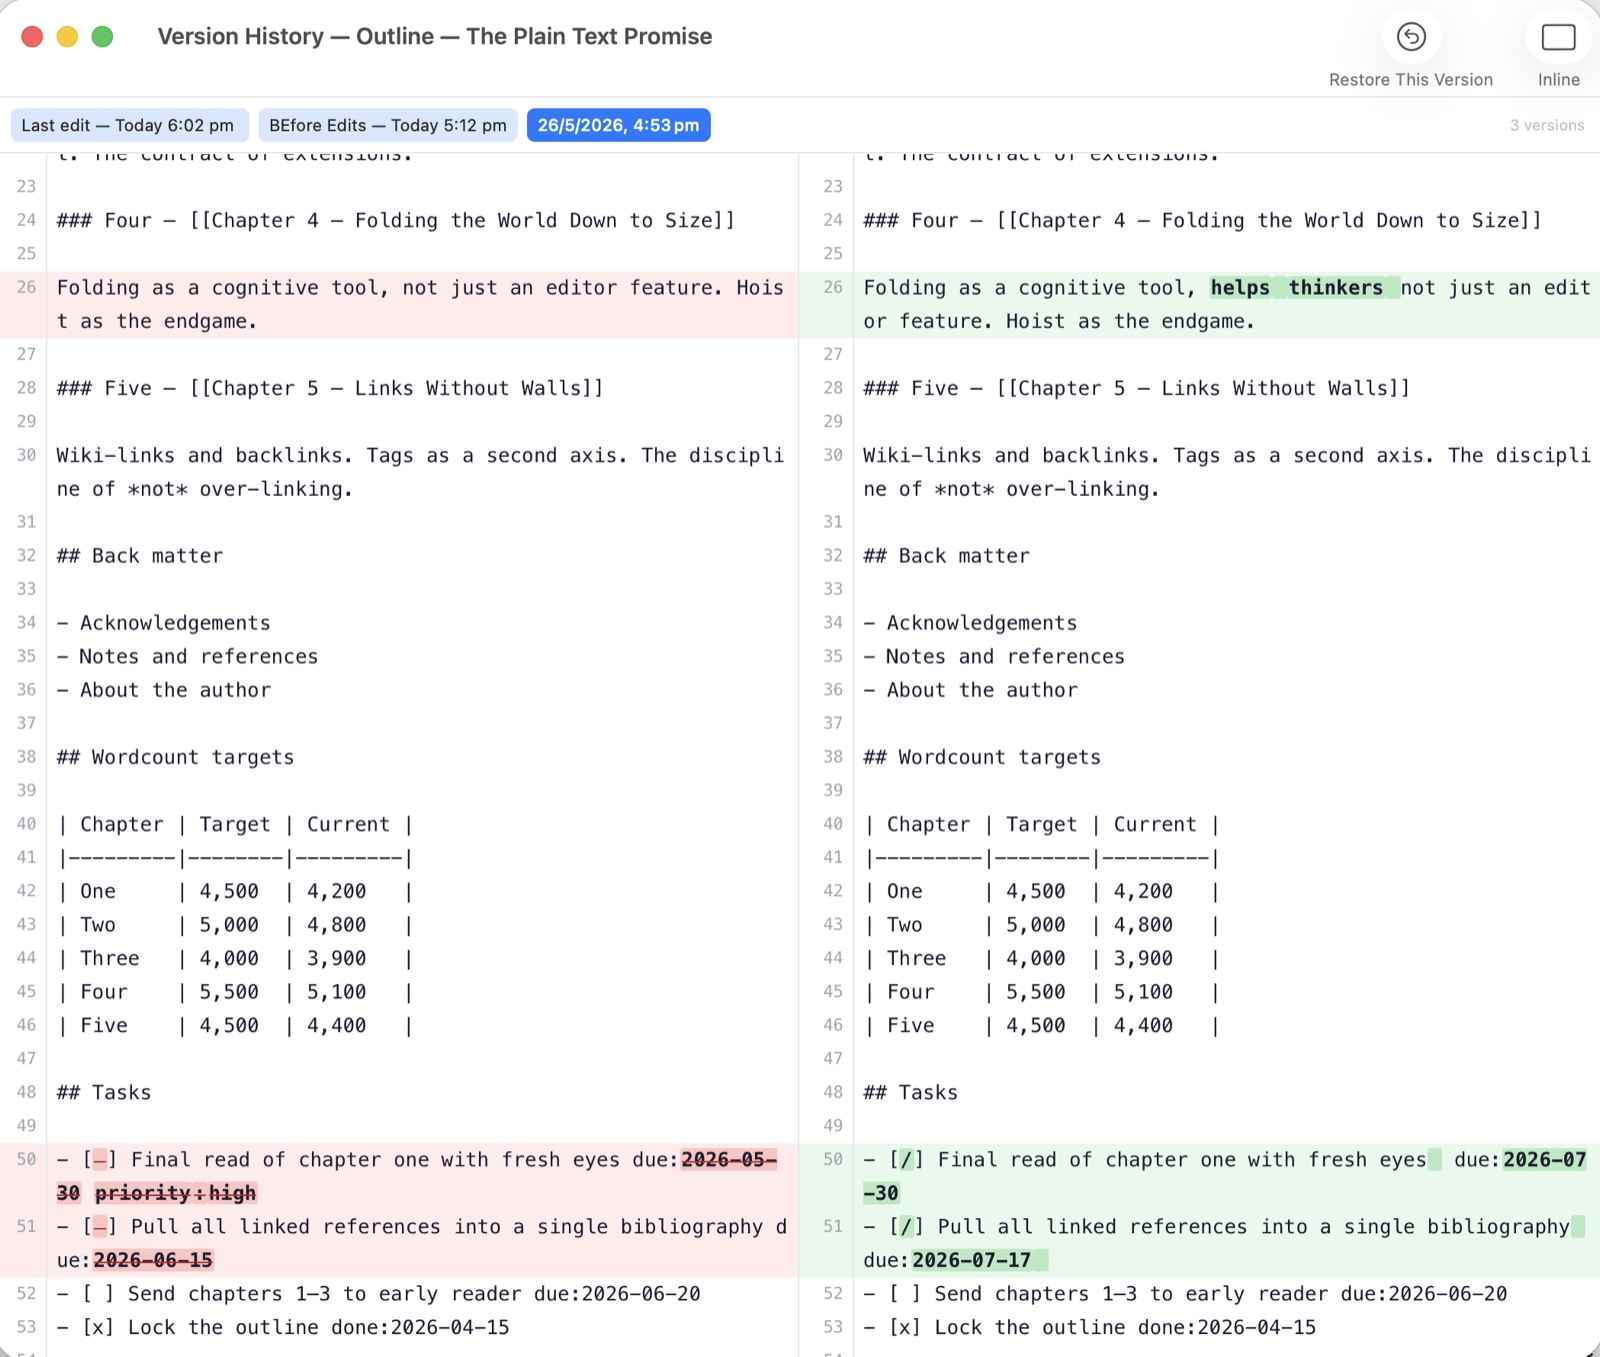
Save snapshots before big edits macOS
Save Snapshot (Cmd+Shift+S) creates a named, persistent version of the current file. Before a major edit pass, take a snapshot called “Before line edit”. If it goes badly, the Version Browser lets you restore it — or open both versions side-by-side and compare paragraph-by-paragraph in the Diff Viewer.
Snapshots persist across iCloud sync and survive forever (unlike macOS’s automatic versions, which get pruned). They’re your insurance policy when an editing session goes sideways.
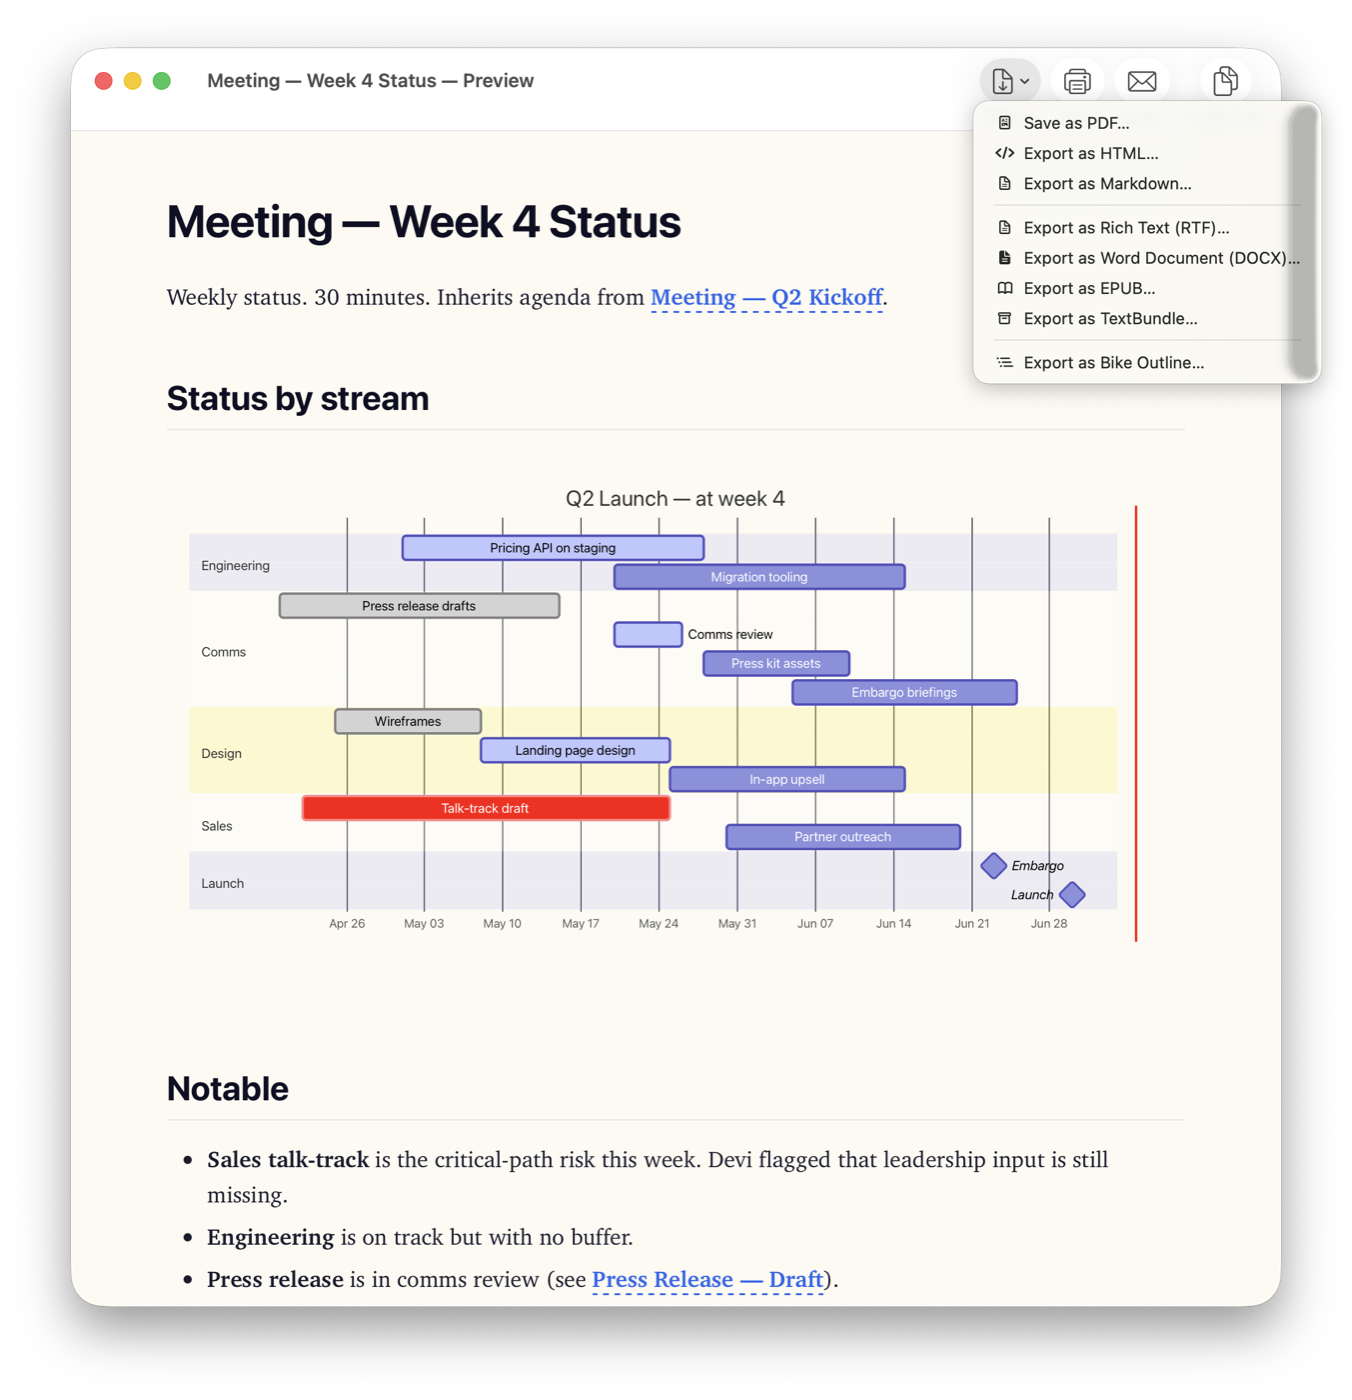
Export to whatever the submission wants
Markdown is convenient to write, but no editor accepts it. FoldNotes exports to PDF, DOCX, EPUB (macOS), HTML, RTF, and TextBundle — including pagination, headers, and your stylistic theme. Send the DOCX to your editor; submit the PDF to the agent; load the EPUB onto your reading device to proofread it as a finished book.
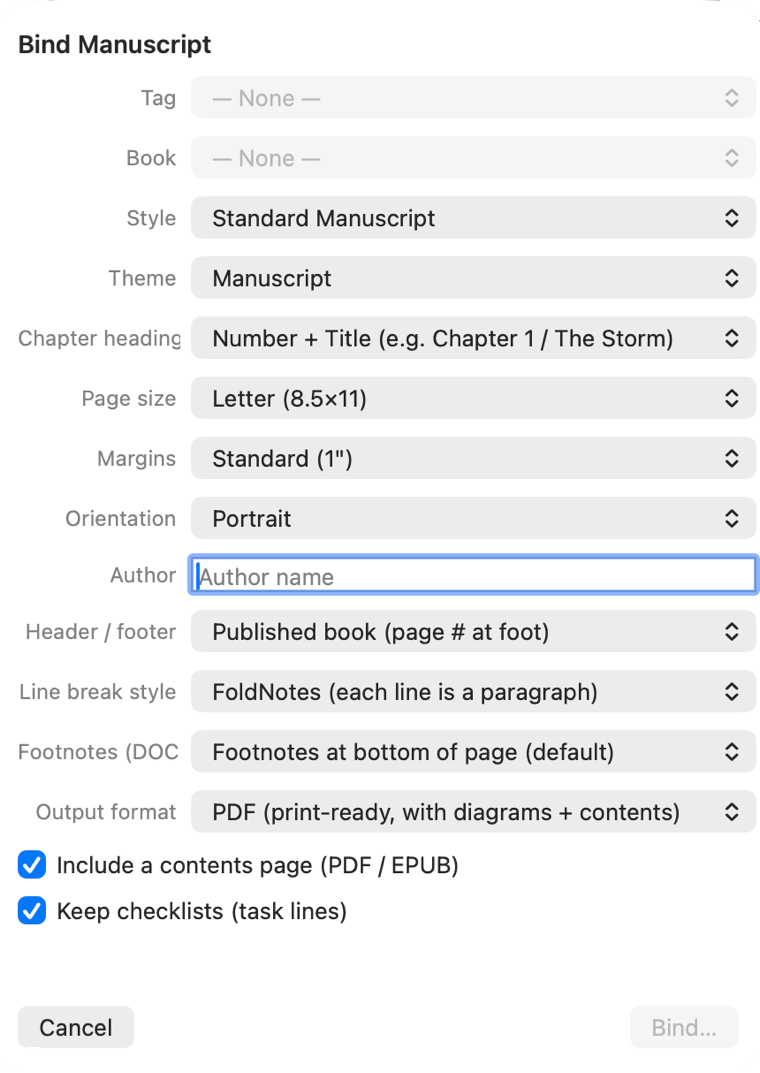
Bind your chapters into a book
When the draft is done, Bind Manuscript compiles every chapter under a tag into one print-ready document — in the right order, with a contents page, chapter headings styled the way publishers expect, and your choice of page size, margins, and header/footer. Output to PDF, EPUB, or DOCX. You can keep your task checklists in the bound copy for a working proof, or strip them for a clean submission.
Plain text, in iCloud, forever yours
Every note is a .md file under iCloud Drive/FoldNotes. Open them in BBEdit. Pipe them through pandoc. Back them up to a USB drive. Git them. The choice of editor is forever yours. FoldNotes is just one way to look at the same files.
When the day comes that you want a different tool — or no tool at all — your manuscript is already on your filesystem in the most portable format text can be.
Start writing
Free on iOS and iPadOS. Mac is paid — lifetime licence or subscription, your choice. Download and go — there’s no FoldNotes account to create. iCloud (which you already have) handles syncing across all your devices automatically.